E-Commerce

(1) Creating a smooth e-commerce experience
So, you’ve started selling online and customers are buying right from your website. Great. But are your customers as happy as they could be? Is the shopping experience and checkout process as smooth as possible?
Once you’ve taken your first steps into e-commerce, your next job is to improve the shopping experience. From getting more people to use your online shopping basket to streamlining the checkout process, there are lots of ways to improve your site for shoppers.
We’re going to look at how you can use analytics to continually improve your customers’ ecommerce experience. We’ll cover optimising for different devices, improving navigation and search, optimising your product pages, and finally, using customer accounts to enhance the checkout process.
(a) Different Devices
The first step to optimising the e-commerce experience is ensuring that the purchasing process works smoothly on all the different devices your customers might use. These days, that means more than just laptops and desktop computers.
Say you look at your analytics data and learn that plenty of people visit your site from their mobiles, but they rarely make a purchase. That’s a clue that shoppers on mobiles or tablets may not be able to properly see your product pages, or move smoothly through the payment process. You’ve got some work to do. One great option is to implement a “responsive design” into your website. This type of design can adapt to different screen sizes. Or, if you want to guarantee a more consistent shopping experience on smartphones, you could even create a dedicated mobile website.
(b) Navigation and Search
Say your analytics show that lots of people visit your home page, but they aren’t taking the next step and actually looking at your products. You’ll want to make it easy for your visitors to browse and find what they’re looking for. This starts with navigation that your customers can easily understand and use. Typically, you’ll use categories and subcategories to organise your inventory in any number of ways. Let’s use the example of a furniture maker. You could start out with broad categories of, say, different rooms in a home. Then, you could add subcategories of furniture pieces in each, like “bed frames” or “desks” or “dining room tables.”
So what’s the best way to go about this? Well, the answer is the one that your customers like best. You can conduct formal testing to see how your visitors react to different arrangements, or you could simply survey your friends, family and some trusted clients to see what they prefer.
No matter how you arrange your site navigation, there will always be people who prefer to search for something specific rather than browse through various categories and subcategories. That’s why it’s best to cover both options and include a search function on your website.
(c) Product Pages
Your product pages are another great way to optimise the shopping experience. What if you’re seeing that lots of people visit your product pages, but they don’t add any products to the shopping basket? You might add video of a craftsman in action, or a gallery of photos from various angles to help customers get a closer look at a particular piece of furniture. Make sure those photos are professional quality, and load quickly. You can also write up great descriptions and provide all kinds of details and measurements—whatever helps customers feel confident that they’re ready to buy.
(d) Customer Accounts
The last thing we’re going to look at is how you can optimise the e-commerce experience by using customer accounts. You might notice in your analytics data that customers shop on your site, and put products in the cart, but then leave before completing their purchase. Encouraging customers to create an account can streamline the process so this happens less frequently in the future. As a customer completes an online purchase, you can allow them to store their shipping and billing information and payment preferences in an account on your site. This will also make future purchases that much easier. If you’re ready to get super advanced, you can also use a customer’s past purchases, recent searches, or recently viewed products to recommend specific items that might interest them. If they just purchased a dining room table, for example, you might recommend the best sets of chairs to go with that design and wood finish.
And of course, you can always reward your loyal customers with offers and discounts tailored especially for them—lots of shopping cart solutions offer these features by default. To sum up: Optimising e-commerce is an ongoing process that requires a consistent experience across devices, smart site organisation, and smooth checkout using customer accounts.
(2) Product promotion and merchandising
If you have an e-commerce store, you probably offer a number of different products. Sometimes it can be difficult for customers to find the best match for their needs. Product promotion and merchandising can help. We’ll examine the best ways to promote products and special offers. We’ll show you how to predict which products your customers might like. And help you showcase products your visitors might not normally see.
The first step is to set up your online shop. That way it’s easy for your visitors to browse all of your products. You’ll want to create the right hierarchy of categories and subcategories, which will help a customer navigate your site and the products for sale.
(3) Promoting Products and Specials
Promoting products in an online shop isn’t too different from a high street shop. Think about the last time you visited a furniture shop. You probably didn’t just walk in and see a map of the shop’s aisles pointing to where the products could be found. More likely, you walked in to see a really comfy sofa near the door that you could sink right into.
Like a brick-and-mortar shop, online shops also display very specific, featured products. If it’s the end of summer and kids are going off to university, the furniture shop might have desks or bookcases on display and on sale. This is an example of product merchandising. You can do the same thing online, starting by promoting certain products right on your homepage. Your promotion might be to help shift old inventory, or feature a best-selling item you want more customers to see. Using part of your homepage to showcase products, or even running online advertising campaigns with dedicated landing pages, can be a great way to merchandise online.
(4) Predicting Products Your Customers Might Like
Imagine if you walked into an offline furniture store and the front door display magically transformed based on your interests. And as you browsed, all the promotions you encountered were customised to what you had previously looked at. That’s exactly what online shops can do! As visitors browse the pages of your site, you’re collecting data about what interests them. Now, you can use this data to predict what they are likely to be interested in next.
Think of the last time you were shopping online. You might have been shown “recommended products” after viewing certain items, or putting them in your cart. For instance, if you were on a custom furniture website, and you were looking at kitchen tables, you might have seen a promotion for chairs, or window shutters to match the room.
Many shopping cart providers, such as Magento, Volusion, Prestashop and Shopify, offer these product recommendation engines.
(5) Showcasing Products Visitors Might Not Normally See.
Next up in product promotion and merchandising is finding ways to showcase products that your visitors may not have otherwise been looking for. This can be a really effective way to cross-sell.
How does this work? Well let’s imagine an office manager is looking for a new executive desk for the big boss. Something grand and ornate. But he might not have been thinking about matching bookcases, or custom doors. Now is the perfect time to remind him. Promoting related products can help increase sales.
The world of e-commerce offers you plenty of great ways to make sure your customers see and interact with relevant products on your site. You can create a virtual display as they enter your site. Or use data to suggest what they might buy next. So get out there and start selling!
(6) Retargeting for e-commerce
After shoppers have interacted with your website, product retargeting campaigns can help you get them back by showing them related ads across the web.
(a) What Product Retargeting is
With product retargeting your e-commerce website can track shopper behaviour, and respond with dynamic advertising. And that this can be used to bring visitors back to your shop, even after they’ve left to visit other sites.
We’ve all browsed an online shop, put a product in our shopping cart and then, for whatever reason, decided not to buy it. Think of the last time you did this. Did you then suddenly start seeing ads for that product you didn’t buy on other sites around the web? Yeah, well that’s what we call retargeting.
(b) How Product Retargeting works
The way a shopper behaves on an e-commerce site can tell that shop owner a lot about which products they’re interested in, and even what they were on the verge of buying. This is very useful information for your business. Because it allows you to create very specific advertisements aimed at people who have showed interest in certain products. That’s what product retargeting, or remarketing, is all about.
Let’s say someone is shopping online for bespoke furniture. They visit your e-commerce site and fall in love a beautiful kitchen table you’re offering. But halfway through the checkout process, they decide to hold off and see if another shop had any specials first. Luckily while they were browsing your online furniture store, you were using a product retargeting solution. This is a small bit of code placed on the pages of your website. This code tracks which products on that page a shopper is interested in. Of course, this tracking code uses anonymous methods. No personal information is exchanged. But what has happened is that your website tracked a behaviour. It now knows that the shopper wanted that kitchen table AND that they didn’t actually buy it. That online shopping behaviour is great information for you as an advertiser. Now, you can use this information to take ACTION. This is where product retargeting solutions come into play.
There are a number of product retargeting options out there. All of them will allow you to collect information, and then target audiences with customised ads based on that information.
So let’s say the shopper leaves your furniture shop and clicks over to a news website. They’re reading an article and off to the right of the page what do they see? Yup, your digital ad with an image of the kitchen table they were just looking at! You may even include a 20 percent discount here too. That incentive just might be enough to persuade them to make the purchase after all. That’s basically product retargeting. There are many services available, like Google Ads and Criteo. The services share some basic functions, so let’s talk a bit more about that.
It starts with that bit of code we mentioned that tracks shoppers’ interactions. This information is then sent to your product retargeting service. As an advertiser, you can go to your product retargeting service and set up rules and parameters. So when a person browsing your site meets those parameters, the service will then start targeting them with advertisements over one or more of the Internet advertising networks. Since the service knows exactly which products your shopper was interested in, those advertisements can be very specific and dynamic.
(c) Tips for successful retargeting campaigns
Now let’s look at a few guidelines for running these kinds of campaigns. First, you don’t always have to offer a discount right away. While in the earlier example we considered price as a reason the shopper didn’t buy, in reality there are loads of reasons people leave websites without making a purchase. And if you always offer a discount, you could be selling yourself short.
Next, it’s good to know when to STOP showing these ads. It’s certainly possible that the visitor found the same product somewhere else and bought it, or simply changed their mind and isn’t going to buy it at any price. Most retargeting solutions allow you to set limits and experiment with just how many times you’ll show the same ad to the same person, and for how long.
As with any advertising campaign, it’s important to measure and optimise the performance of your product retargeting campaigns over time. This means tracking conversion rates, testing new types of ads, tweaking your parameters, and using analytics to manage these campaigns.
(7) Using e-commerce to sell
Whether you’re a traditional retailer, a service business, a wholesaler or even an Internet startup, there are many ways you can use e-commerce to reach more customers and increase sales.
(a) What E Commerce is
So first, what is e-commerce? Well, it’s really just a fancy name for selling things online. People have been making online purchases on websites and mobile applications for a while now. And all kinds of businesses are finding ways to make use of e-commerce to achieve their sales goals online. These goals vary, depending on the business. You might start with a simple goal, like “I want to offer customers the ability to send payments through the web.” Or, maybe you want a lot more—a website that allows people to view and search your inventory, create customer accounts, and set up recurring orders. The sky’s the limit. So how do you get started with e-commerce for your business?
(b) Varying Levels of Ecommerce used in business
Your first step might be to simply offer a way for customers to transfer money to your business through the web. You can easily add payment services like PayPal to your website that make online payment easy. In many cases, your customer doesn’t even need to setup a PayPal account and can pay through credit card or direct debit.
If you’re starting to sell online from scratch, you might try an “off-the-shelf” service that includes e-commerce, like Squarespace or WordPress. These services not only accept payments, but they usually offer templates so you can easily add product pages to your website.
If you’re going for the gold, you might decide on a customised e-commerce service like Magento or Shopify. There are many options available, with feature like product search, inventory management, checkout, customer accounts, order management and more. E-commerce often brings to mind a sort of retail or shop-like experience. Any business that sells products in a physical shop can also sell their products on a virtual shop online. Your online shop can bring your products to life by including lots of photos, detailed descriptions, customer reviews, and even videos of the products. This high-quality imagery and well-written content is like your online “product display”. Done well, it can help narrow the gap between a customer’s retail and online shopping experience.
After you’ve sorted out how to sell products on your own website, you want to sell more products, in more places. So, your next step might be to look into other online marketplaces. For example, you might also sell your furniture through sites like Amazon and eBay. If this is one of your goals, and you haven’t yet selected an e-commerce provider, make sure that they support your multi-channel selling.
(8) Taking payments and manage orders
If you decide to sell products and services online, many tools and solutions are available to help.
(a) Handling online payments
One of the primary features of your e-commerce shop is being able to accept payments online. There are many options that can do this for you, and they range from relatively simple to fairly complex. You can do this using any number of online payment solutions, or what’s known as third-party payment processing, with services such as PayPal and Nochex.
These types of payment solutions let you add a button to your website, which customers can click to make a payment. This takes them to a separate payment website, which takes care of the transaction for you. Then after the order is complete, the customer is sent back to your site.
As transactions occur, you will receive all the information you need to fulfill the actual customer orders. So this approach means you can just focus on your business, while someone else takes care of the complex electronic transactions.
At some point, you might want to integrate the transaction experience into your website, such as offering online payments and a shopping cart that lets customers buy multiple items in one session.
Despite the additional costs, this integrated process provides very real benefits. One way to start is to use an “off-the-shelf” service, like Squarespace. These services give you more control over the shopping and checkout process and let you make changes and improvements.
For example, you might want to customise the thank-you page with specific offers. Or promote other furniture designs relevant to what the customer has already purchased. Another benefit? You can track the entire customer experience, including the digital marketing campaign that brought visitors to your site. You can get more information about these people and see what website content they interacted with. And, you can learn what the most likely prospects tend to do on your site.
Now, let’s say your furniture design business has grown. And now you want to expand and offer furniture sets for every room, in every possible wood finish, to customers throughout the UK.
When you have loads of products to sell online to a broad audience, it’s probably time to consider a full e-commerce solution. There are many on the market— such as Shopify, Volusion or Magento. Some are free, others you’ll need to pay for. And they all offer a wide range of features. But one common thing many of them offer is the ability to create and manage a fully functional online store. A fully functional online store has a big benefit: a backend system with order management.
(b) Managing Orders
Let’s take a closer look at how a backend system can help you. Well, first, your customers can create accounts and manage their personal information, billing preferences, and shipping addresses. You can offer them coupon codes, integrate multiple payment options, and even customise the checkout process.
And rather than program all of this yourself, you can use these e-commerce services to upload and manage product and inventory details, create and organise category, subcategory and product pages, and offer advanced product search.
Many solutions manage orders, track shipping and fulfillment details, and integrate with your financial and accounting systems.
(9) Creating your Online Website
While creating your online store make sure to choose the right platform. There are two popular eCommerce platforms that we recommend: Shopify or WordPress + WooCommerce.
Shopify is a fully hosted paid eCommerce solution that starts at $29 / month. It’s a hassle-free solution where you just login and start selling. The downside to Shopify is that it gets quite expensive, and your payment options are limited unless you pay additional fees.
This is why most users choose WordPress + WooCommerce because of the flexibility it offers. It does require some setup, but it’s worth doing it for the long run. WooCommerce is the world’s largest eCommerce platform.
So you’re looking to set up an online store, and you’re looking to WordPress to make it happen. We get that – after all, 30% of websites live today are powered by WordPress, and with good reason. It’s a powerful, scalable platform, and best of all, it’s free!
That said, you shouldn’t automatically reach for WordPress without considering some alternative options. WordPress is a great platform, but it isn’t for everyone. If you’re just looking to sell a few products as a side hustle, for example, using WordPress would be like hiring a bus instead of taking an Uber; time consuming, costly, and rather unnecessary.
If you’re sticking with WordPress, then great – let’s get down to how you actually go about building an ecommerce site. Even if you’ve already installed WordPress, stick with us for the first three sections. Here are the 9 steps to launching your ecommerce website with WordPress:
(a) Get hold of the perfect domain name
Your domain name is basically your website’s unique address. It’s the part after the ‘www.’ in your URL. You can buy a domain name from sites like GoDaddy or NameCheap. It’s generally a good idea to keep your domain name as close to your brand name as possible, and to keep it short and memorable.
Also ‘.com’ is the ‘strongest’ and most popular domain extension (ending). It’s a smart choice for online stores, as it leaves you open to selling worldwide. Pick a country-specific extension (e.g. .us) and you risk limiting your potential for expansion further down the line.
(b) Sign up to a hosting provider
Okay, so now you have got a domain name for you online business – now it’s time to find a hosting provider. Every website needs hosting. It’s the equivalent of renting a spot of internet land – just make sure you pick a patch with plenty of room to grow! When it comes to choosing the best hosting provider, as well as the type of hosting you actually need, you’ll need to think about the kind of store you’re building. One thing we will say, though, is skip shared hosting. When you’re sharing a server with other websites, if one of them gets hacked, your site is left vulnerable, too. When you’re dealing with people’s credit card details, this simply isn’t worth the risk.
Once completed, you will receive an email with details on how to login to your web hosting control panel (cPanel). This is where you manage everything from support, emails, among other things.
Go ahead and login to your cPanel.
(c) Install WordPress
There are two main ways to install WordPress:
- ‘One-click’ install through your hosting dashboard
- Manually downloading WordPress, then uploading it to your hosting account
The first option, ‘One-click’ WordPress installation is definitely the easiest. When you’re choosing a hosting provider, look for those offering the perk of ‘one click’ installs. Once you’ve signed up with a hosting provider which offers this kind of installation, basically all you have to do is go into your hosting dashboard and hit a button that says ‘Install WordPress’.
If your hosting provider doesn’t offer one-click WordPress installation, it’s a question of downloading WordPress to your computer, then uploading it to your hosting dashboard. It’s easy enough, it’s just not as easy.
If your WordPress hosting package came with a free SSL Certificate, this certificate will be preinstalled for your domain name. However, your WordPress site needs to be configured, so it loads as https vs http.
On the Settings » General page, you need to change your WordPress Address and Site Address to use https instead of http.
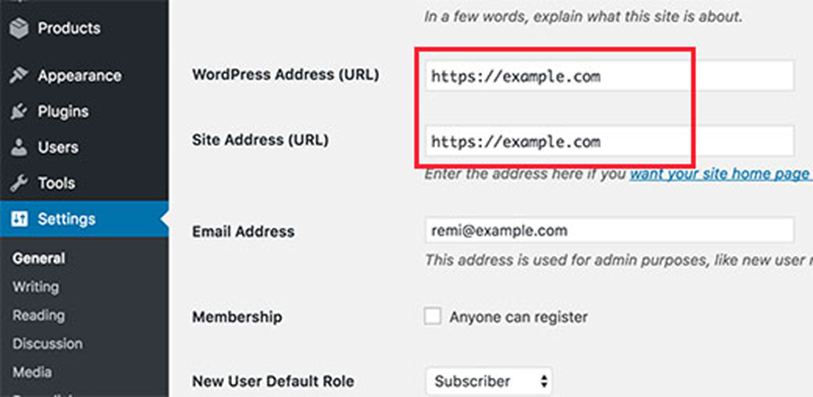
Don’t forget to scroll down to the bottom of the page and click on the save changes button to store your settings. Your basic WordPress setup is complete.
(10) Install and configure WooCommerce
WooCommerce is the most popular plugin for adding ecommerce functionality to your site. It’s fair to say it’s pretty popular, and it’s easy to see why. For starters, it’s free. Like WordPress itself, WooCommerce is an open-source platform built by a community. While you may have to pay for some ‘extensions’ (e.g. the ability for customers to book appointments), you can turn your site into an online store without spending a dollar. That includes:
- Product pages
- Cart and checkout
- Secure payments
- Shipping options and label printing
- Automated tax calculations
- Integration with Google Analytics, Facebook, MailChimp etc.
(a) Install and Activate WooCommerce
Log in to your WordPress dashboard, and head to the plugin directory by clicking ‘Plugin’ on the left hand menu:
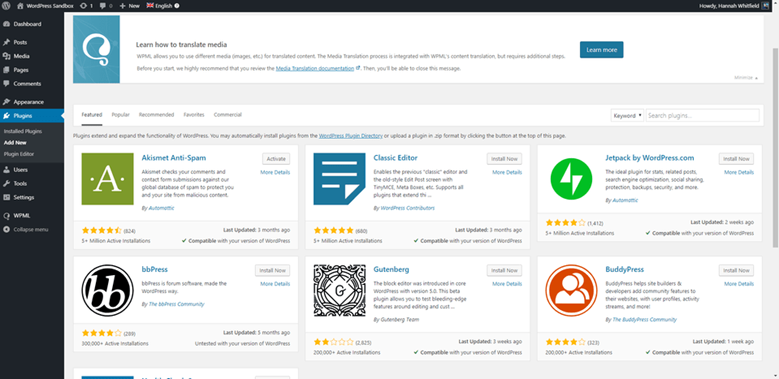
Search for ‘WooCommerce’ in the search bar, then click the gray ‘Install Now’ button.
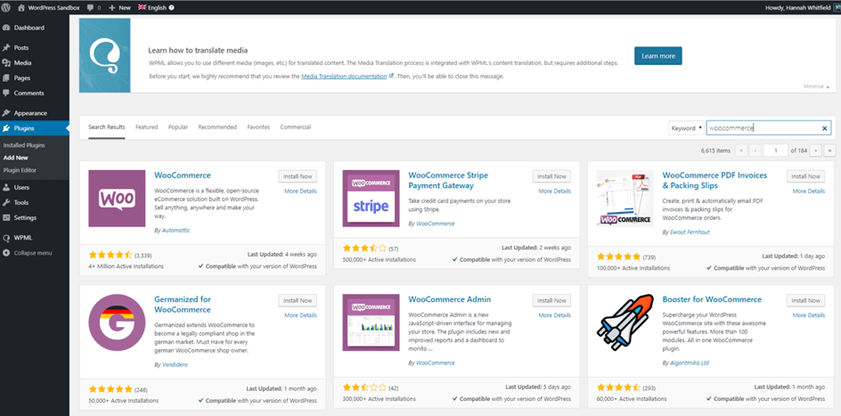
After a few moments, this button will turn to a blue one which says ‘Activate’. Click this. WooCommerce’s helpful setup wizard will then open to walk you through the rest of the setup process. Go ahead and click on the ‘Run setup wizard’ button in the notification.
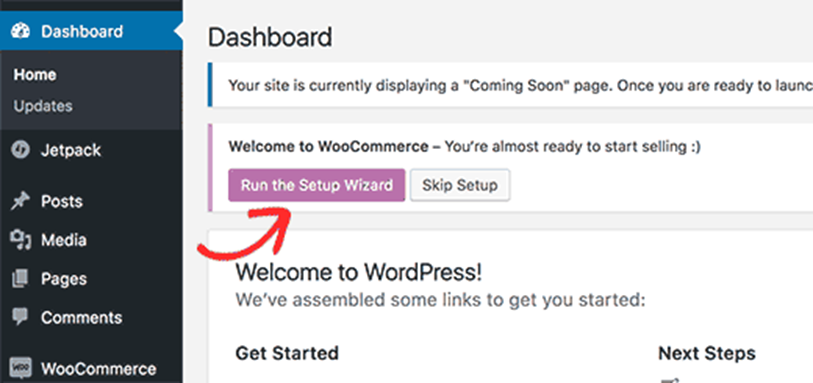
This will launch the WooCommerce setup wizard where you need to click on the ‘Let’s go’ button to get started.
Add business details – First, you’ll need to fill out your business’ details, which is pretty selfexplanatory:
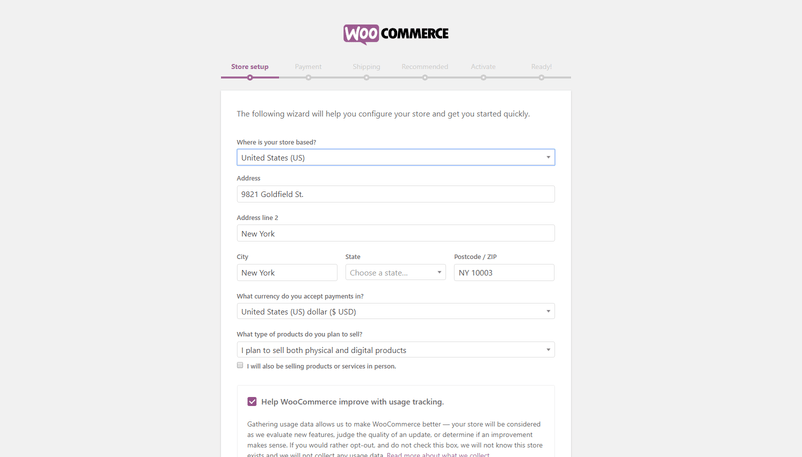
Make sure you select the right option under ‘I plan to sell both physical and digital products’. Digital products are typically anything that’s downloadable – think WordPress themes, online courses, stock photos etc. A digital camera, on the other hand, would be a physical product.
Select payment options
The next step is to choose the payment methods you’ll accept through your store.
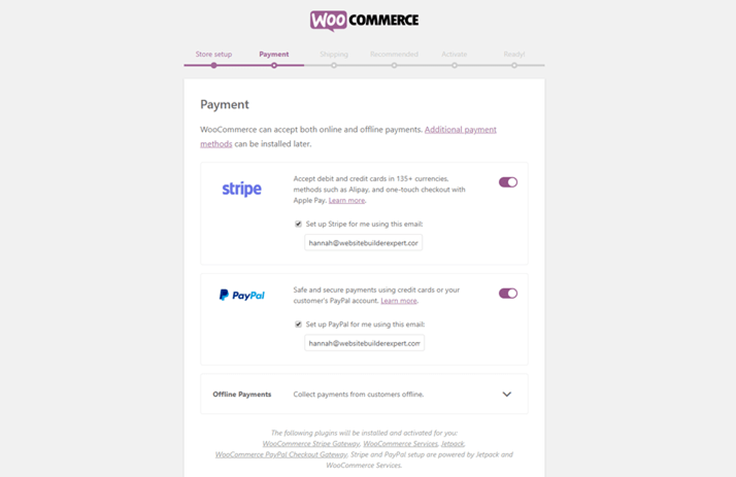
As Stripe and PayPal are both popular options, we’d recommend you enable both. You can add your accounts at a later date if you don’t have them set up yet.
Confirm shipping options
Next, you’ll be asked to choose your shipping rates. WooCommerce will recognize the area you’re currently in, and set this as your main ‘shipping zone’, with the other option basically being ‘the rest’:
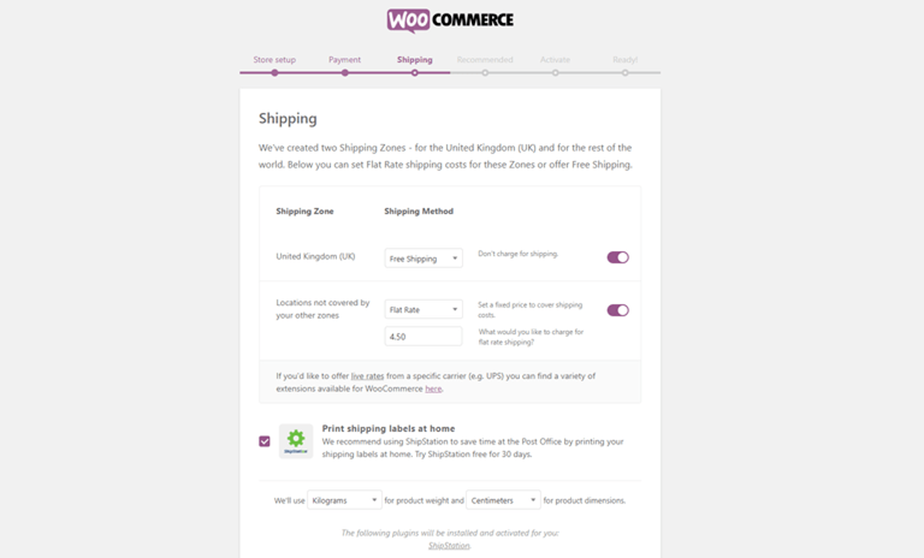
You can either set a fixed price for each zone, set shipping as free, or integrate with specific carriers to get ‘live’ shipping rates.
Choose complementary plugins/theme
The next stage is to decide which ‘recommended’ plugins to take forward to your store, and whether you want to opt for WooCommerce’s own theme.
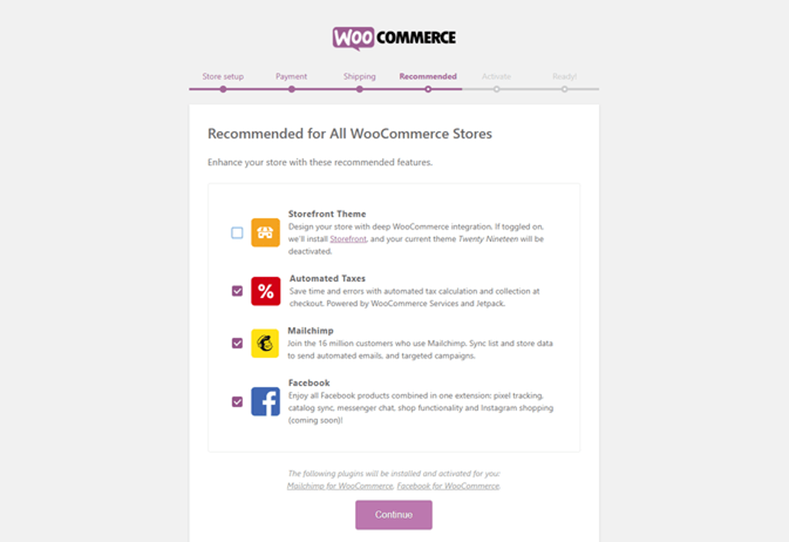
It’s really easy to add these later on, so don’t feel you have to commit to anything right now. We’ll cover recommended plugins and themes a little later on in the article, so feel free to ‘unselect’ these for now, unless you’re sure you need them.
(b) Choose a theme
Your ‘theme’ will act as the basic design for all your web content, it makes sense to choose a theme that looks as close to your desired finished product as possible.
WooCommerce also has its own theme – Storefront – which works seamlessly with WooCommerce, and looks pretty sleek too. But if you don’t like the Storefront theme, then you can use another theme. Once you’ve got a decent number of products ready to go, it’s time to move on to the more fun stuff – choosing a theme! That said, while choosing a theme don’t forget to ‘demo’ each one to get a feel for how your real-life site could look.
You can find a selection of free WordPress themes in the theme directory, which you can access through your dashboard:
- Log in to your WordPress dashboard.
- Hover over ‘Appearance’, then click ‘Themes’. This will take you through to the theme dashboard.
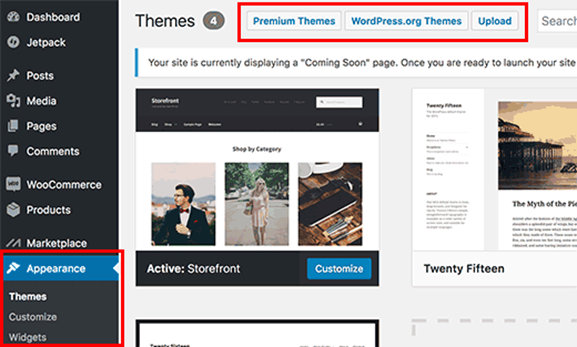
- Click the button above the themes that says ‘Add New’, then browse themes under ‘Featured’, ‘Popular’ etc., or use the search bar to search for specific industries.
- Demo a few themes to find the one you like, then hit ‘Install’ under the theme to download it.
- After a couple of minutes, a button will appear under the theme that says ‘Activate’. Click this, and the theme is all yours!
To install a premium theme on your site:
- Download the .zip file of your new theme.
- Log in to your WordPress Dashboard.
- Hover over ‘Appearance’, then click ‘Themes’. This will take you through to the theme dashboard.
- Click the button above the themes that says ‘Add New’. This will take you to the WordPress theme dashboard.
- Click the blue button at the top that says ‘Upload Theme’.
- You’ll then be prompted to choose a .zip file from your computer. Choose your new theme file.
- You’ll then see a success message, with a link to activate your theme. And that’s it, you’re ready to go!
(c) Add products
In the last stage of your initial WooCommerce configuration – you’ll see a screen inviting you to add your first product.
Let’s start with adding the first product to your online store, just go to ‘Products’ down the left hand side, then ‘Add New’:
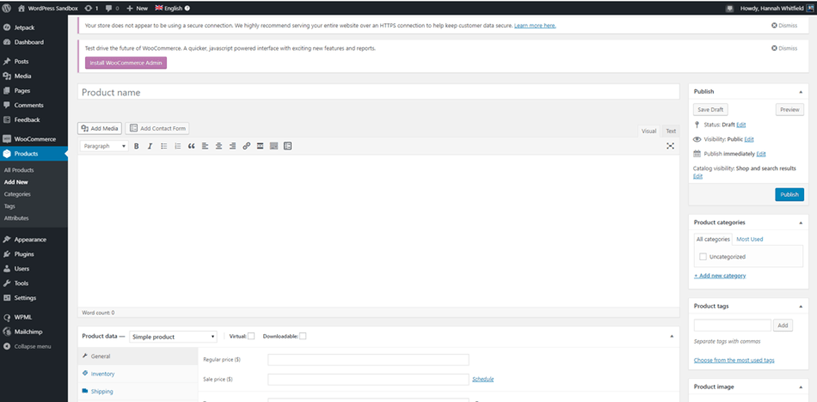
For every product you upload, you’ll need the following things:
- Product name – e.g. Cute Pale Grey Cement Plant Pot
- Price – e.g. $12.95
- Main product image – this should be a picture of the whole product, from the front
- Additional product images (optional, but recommended) – include pictures from as many different angles as possible, and add closeups of finer details
- Product description (long) – e.g. ‘Inject some Scandinavian cool into your home with this simple cement planter. Features a drainage hole and comes with small matching dish, so your plant won’t get over-watered. Height: 15cm. Diameter: 8cm.’
- Short product description – e.g. ‘Simple cement planter with drainage hole and matching tray.’
- Product category (if you have more than one) – e.g. Plant Pots
Adding products with WooCommerce
How you add products to your site depends on the type of product you’re adding. There are six main types:
- Simple
- Grouped
- External/Affiliate
- Variable
- Downloadable
- Virtual
WooCommerce has an excellent, detailed guide explaining what each product type means, and how to go about uploading each type. For now, we’ll stick with our plant pot example. This is a simple product (the pot in question doesn’t have any alternative sizes or colours – if it did, it would be a variable product).
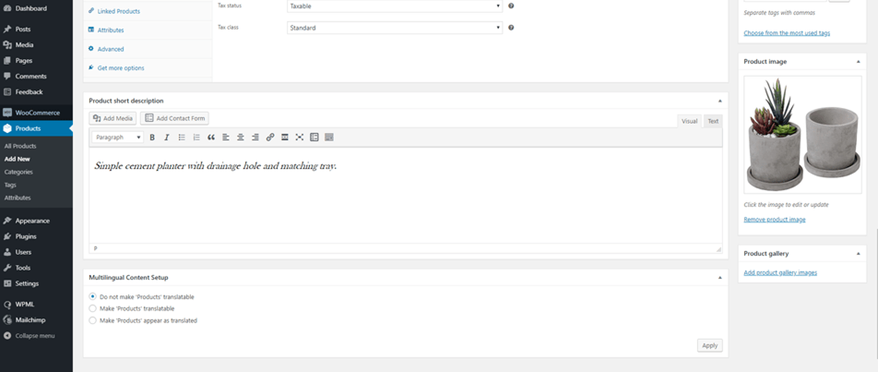
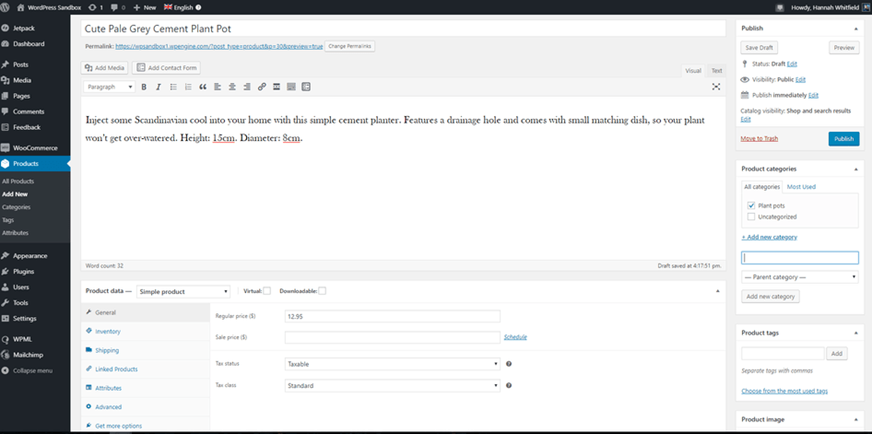
Here, you can see how we’ve populated this screen with all the information we included above. Note how we’ve added this product to the category ‘Plant pots’ on the right hand side. We just clicked ‘+Add new category’ which is underlined on the right, named our new category and selected it, then unselected ‘Uncategorized’. If we had more pictures of our lovely plant pot, they would go in the ‘Product gallery’ section under the main image.
Once you’ve added this key information, you’ll need to click through all the tabs in the middle to add all the specific details of your product. Here’s a quick overview of what’s covered in every tab of the product data section:
- General – this is the tab we’re in currently, and covers price and tax
- Inventory – the place to add SKUs etc. if you want to be able to track your inventory
- Shipping – product dimensions and shipping cost
- Linked products – update later with complementary products to upsell
- Attributes – if you have a variable product (one with different sizing or colour options, for example), then this is the place to add the different versions
Once you’re happy with your product, hit the blue ‘Publish’ button towards the top on the right hand side.
To see any products you publish, go to ‘All products’ in the menu on the right, and they’ll appear like this:
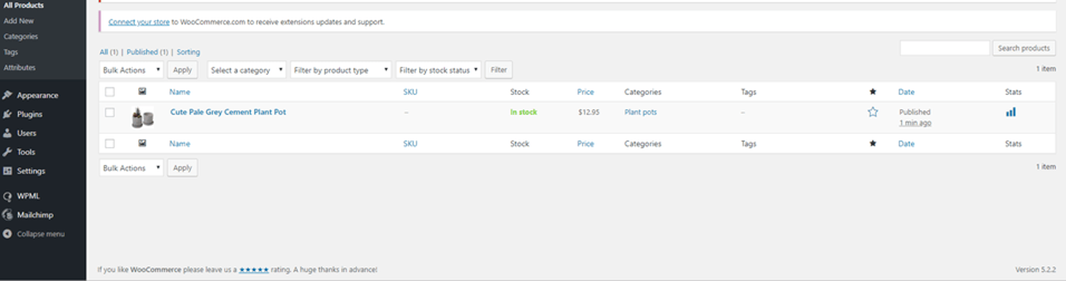
(d) Install additional plugins
Alongside WooCommerce, here are four plugins we really rate for online stores:
- Yoast for SEO guidance
Yoast SEO – the handy plugin that will help you climb the search engine rankings, giving you the best possible chance of securing a spot on page one. SEO stands for search engine optimization; it’s all about making small changes to your site to help search engines ‘read’ and ‘understand’ your content better, and to ‘prioritize’ it well as a result.
- Securi for security
When you’re dealing with card payments on your site, the security stakes are much higher. While there are free security plugins available (such as Wordfence), we think this is an area that’s worth spending a little extra on. Securi plans start at $199/year, and you’ll need to install the free plugin from the WordPress directory to enable it.
- Site Reviews for reviews.
It has been consistently proven that social proof is one of the most important factors for getting users to take a desired action – in this case, that means buying your products. Installing Site Reviews will enable customers to leave a review on your site.
Adding plugins to your site is super simple:
- Log in to your WordPress dashboard.
- Head to ‘Plugins’, then ‘Add New’.
- Use the search bar in the top right hand side to search for specific plugins, or the general feature you’re looking for.
- Once you’ve found one you like the sound of, look at its reviews and ratings to check it seems trustworthy.
- Once you’re happy with your choice, hit the ‘Install Now’ button.
- Once WordPress has finished downloading the plugin, you’ll get a completion message, and be prompted to click ‘Activate Plugin’.
- Next, head to settings to configure your plugin – each one will have a different process for this, but should have instructions in the plugin description.
(11) Add content that converts
Now it’s time to adjust the copy on your key pages. Find these key pages by heading to ‘Pages’, then ‘All Pages’. We’ll be honing in on some specific types of content. Nail all the elements below, and you’ll be well on the way to launching a successful ecommerce store:
Microcopy
‘Microcopy’, sometimes referred to as ‘UX copy’, refers to the little bits of navigational copy on your site, as well as error messages and ‘calls to action’ (CTAs). Word for word, this is the most important copy on your site. It guides users through your site, and reassures/persuades them at key points (such as when they’re about to part with their money).
Take your time to write this with care. Think about your user’s mindset at each stage of their journey through the website. For example, on the homepage, it might be more appropriate to have a button leading to your product saying ‘Find out more information’, or ‘Have a browse’. Something more pushy, like ‘Buy now’, might be very off putting – at this stage, your user is interested in finding out about your brand, but probably not ready to buy.
Product descriptions
These should be short, but helpful – and as the name would imply, descriptive. Think about everything you’d want to know when buying that product for yourself, particularly things that aren’t evident from the product photos. Use bullet points to separate out the information, and keep the formatting and info consistent across all products.
Product images
The quality of your product images can really make or break your site. Use a good quality camera and a simple background for best results. A general rule is, ‘the more product photos, the better’. As with the descriptions, keep your product images consistent for a sleek-looking site. Be sure to compress your images with a tool like TinyPNG or Kraken. This will reduce the file size without compromising image quality, helping to keep your site as fast as possible.
Privacy Policy
An important component of any website, WordPress will actually ask you to select a privacy policy page before putting your site public. Luckily, there’s a handy template available for you to follow. Simply head to ‘Settings’, then ‘Privacy’, then click ‘Check out our guide’. Once that’s written up, just select the right page from the dropdown menu underneath.
(12) Add a payment gateway
You can use an Indian payment gateway like InstaMojo or RazorPay – they are one of the best Indian Payment gateways out there.
Instamojo Payment gateway is the complete solution for anyone looking to collect payment. Install the Instamojo for WooCommerce WordPress plugin which is free & Join Instamojo, which is also free.
Now once you have done the above, things are in place, it’s time to configure the payment gateway.
Activate the WordPress plugin manually in your WordPress dashboard. Once the plugin has been activated, now it’s time for you to configure the payment gateway.
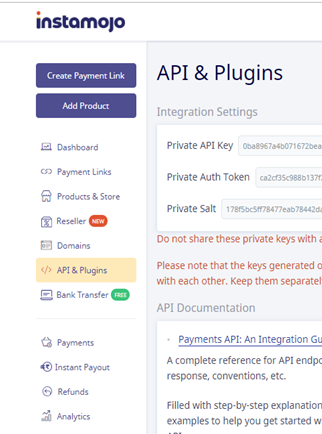
Here is how to get all the details, go to Instamojo Dashboard and click on API & plugins to get all the values of API & Auth:
Now Go to WooCommerce > Settings > Payment to configure the plugin. You need Instamojo API & Auth to make it work so copy all the value to Instamojo payment settings in below WordPress settings (See screenshot below)
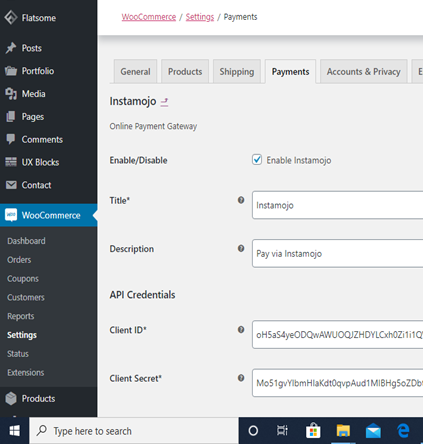
Well, that’s it & now your digital download store is enabled for receiving payments.
(13) Make your site public
Once you’re basically happy with how your site works (remember you can always ‘Preview’ pages to see how they’d look live), it’s time to make it public. This is the easy part!
Go to ‘Settings’, then ‘Privacy’. Once you’ve uploaded your privacy policy, you should see the option to turn your site ‘Public’.